Area of Complex Shapes

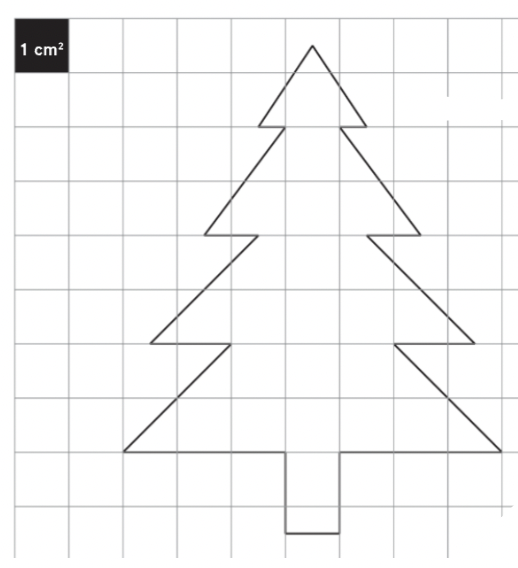
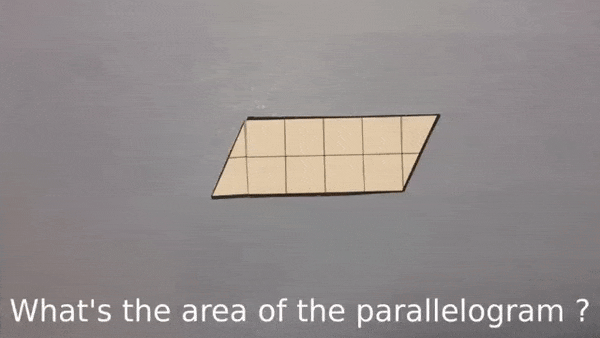
One of my classes has been exploring area lately. They started by counting squares and differentiating between what is considered area and perimeter. Students were able to add halves and reasonably estimate what the area of a rectangle, parallelogram and triangle would be based on a brief observation. Becoming precise was not valued early on in the process but proved to be a tough transition as students were expected to use formulas later in the unit. Late last week students were asked to find the area of the shape below.

At first students were fairly confident in being able to find the area. They quickly counted up the squares that were fully visible. Then added the halves or what they perceived as half.

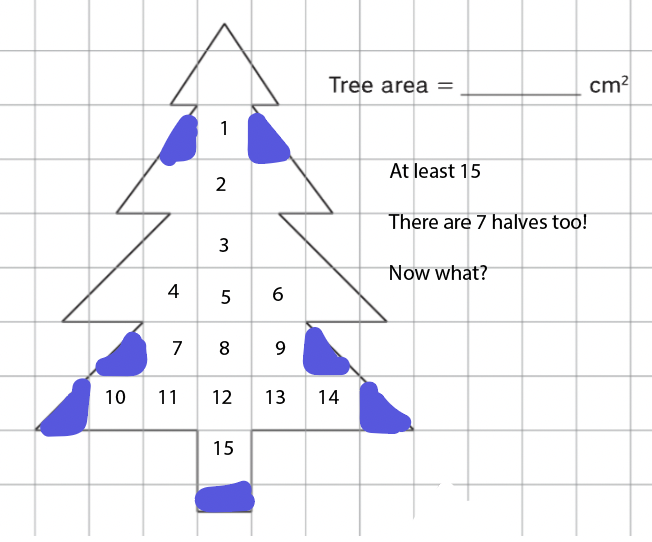
Students knew that there were at least 15 full squares covered and then added the halves. Estimates were given based on the full squares visible and ranged from 20 to 45. Confidence waned during this time as some students erased the numbers and started to deconstruct the shape into smaller shapes.

Earlier in the unit students made the connection that the area of a triangle can be found by using a rectangle method. Students also explored how parallelograms can be modified and rearranged into a rectangle.

Using that understanding, a number of students tried different methods to find the area of the shape. Students worked in groups to find a common understanding of where to start and how to dismantle the shape into parallelograms, triangles and rectangles.

This group decided to split apart the shape into triangles and rectangles. They specifically used the rectangle method to find the area of the triangles and counted the middle.

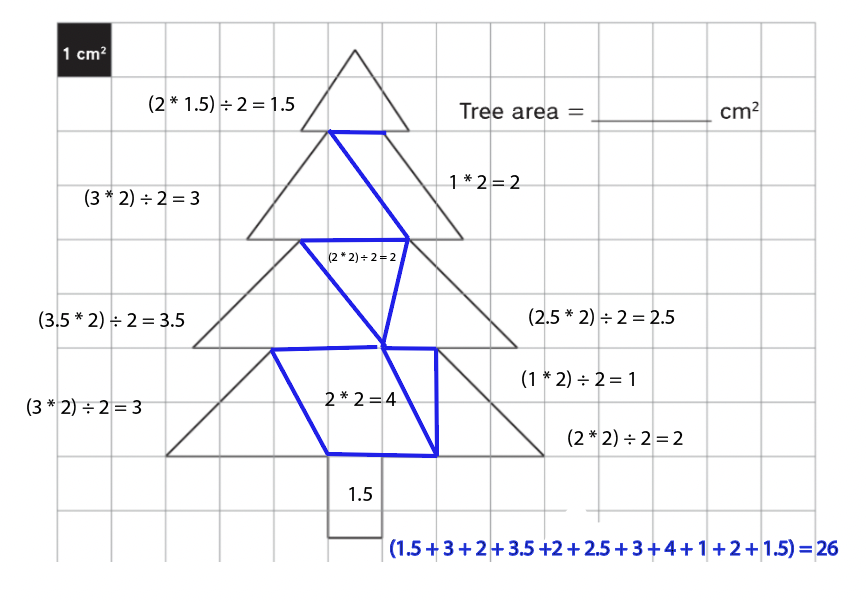
Another group tried a hybrid approach with mostly triangles and two parallelograms. The problem that this group had was trying to decide what constitutes the base and height of each triangle.

The other group decided to split one side of the shape into triangles and the other side into parallelograms. When I showed this to the class I received a few shocked looks. They were amazed at how simple this looked and yet they came up with the correct answer.


Overall, this was a time consuming task, but I feel like it was worthwhile. Students were able to think about math and measurement a bit differently. There are more efficient ways, but not one right way to complete the task. I am hoping that students remember this task and build upon their understanding as we move towards additional measurement concepts next school year.

Area and Volume Skills

Photo Nov 07, 1 44 56 PM

My fourth grade students finished up a unit on volume about a month ago.  This past week I gave the same group a cumulative assessment on the first two units.  After grading the assessment I started to notice trends.  Many students had issues with converting square units to cubic units.  Students also mislabeled units related to measurement.

This is my first year using a new version of a district-adopoted math resource.  This year’s scope-and-sequence had students encountering area first and then volume was discussed in a completely separate part of the unit.  I believe that isolation made students think that problems in the different sections were either 1) related to area or 2) related to volume.  The assessments that I graded indicated that students needed some bolstering in applying area and volume.  Combining them would be a bonus.

Early this week I came across Graham’s Tweet about test questions.

I clicked on the article and found some amazing questions.  I definitely geeked out after trying out a few. These types of  questions made me think beyond one math skill or idea and I thought it would move students in that direction too.  I decided to use the area question with my students.

You see, in the past students have been given the length, width, and height, and then asked to use a formula (often given to them) to find the volume.   In this case, students were given the area and had to use that to find the side lengths.  This type of task in Graham’s Tweet was definitely different problem for them.

I gave each student a copy of the sheet and had them work on it individually for about 10 minutes.  Students initially thought of adding all the area sides together, but then they realized that adding them wouldn’t help in the process.  I redirected students to look at what the question is asking.  There were a few minutes of frusturation as students were looking for ways to find the length, width, and height.

Students were then put in groups to work out the problem.  Eventually, students started to think of factors as they started to investigate numbers that  work for the length.  Some went the route of using a factor rainbow, while others used a trial-and-error method.

Screen Shot 2017-11-10 at 7.55.59 PM.png

More frustration ensued, but students still moved forward.  A few groups were confident that they had a solution.  I briefly looked over all the responses and saw that no one had the correct answer, but I pokerfaced it and had the students work it out at home.  That evening some of the students tackled the problem and came back with a solution.  I was impressed with the perseverance and also how these students applied their understanding of area to find volume.

Exploring Scale Models, Perimeter and Area

Screen Shot 2016-02-20 at 8.39.15 AM

This past week students started to explore perimeter and area. I’ve observed that most students arrive into third grade with an understanding of perimeter. They can find the perimeter around polygons with a ruler or when measurements are given. When polled, the majority of students said perimeter is basically the measurement around something. After discussing perimeter, the class measured the distance around objects in the classroom. Once the class reviewed the perimeter the class moved on to area.  We used scale drawings to emphasize the concept of perimeter.

On Thursday students investigated how to create a rough sketch of a floor plan.

Screen Shot 2016-02-20 at 8.26.53 AM.png

The class used the classroom as an example. Students started by creating a rough sketch of the dimensions of the classroom. Student teams were assigned walls of the classroom to measure. After around 15 minutes students came back and wrote their measurements on the board and in their math journals. Students then transferred that rough sketch data into a scale model. This took time.   We spent around 10 minutes deciding on what ¼ of an inch would represent on a grid. This was time consuming. The class had an amazing conversation on what could be an appropriate scale model that would actually fits paper. Students made the connection between a scale model and how to writer intervals on a graph. Although this was time consuming, it gave students an opportunity to use trial-and-error with different scales. Eventually the class decided on using ¼ of an inch to represent two feet in the classroom.

Screen Shot 2016-02-20 at 8.26.38 AM

The class constructed the scale drawing and put in place the windows, doors and walls. The perimeter was found and then students counted the squares inside to find the area. This was a bit challenging for some as the concept of perimeter and area are different.  During this process students started to identify their own misconceptions about area.  Some of the squares were full while others were halves. Students had to combine the halves to find the total area. Students worked in groups to find different ways to find the area of the classroom. Besides counting the squares, students explored other strategies, such as multiplying the length and width or using some type of array model with squares.

The next day students were asked to find an object in the classroom with a rectangular face. Students found many different objects in the classroom (folder, journal, Kleenex box) while others picked objects that they couldn’t bring back to their desk (window panes, cabinet doors, desk face). Students measured the face uo the nearest inch or half-inch. They created a rough sketch and a scale drawing on grid paper. Students used the grid paper to find the perimeter and area of the item.

Photo Feb 20, 8 15 31 AM

Photo Feb 20, 8 15 41 AM.jpg

Next week students will be sharing their projects with the class. Each student will share their findings and the class will have a conversation about the similarities and differences between perimeter and area.

%d bloggers like this: