Scale Factor – Part Two

Screen Shot 2019-06-18 at 7.35.13 PM

During the last week of school one of my classes explored dilatations.  It was a rather short lesson since there were only a couple days of school left.  After some review, I pulled out a project from last year and thought might be applicable since it addressed the same standard for that particular day. I looked it over and made a few changes so this year it would run smoother.  Here’s what changed:

  • I had the students create an exact 4cm by 6cm grid using rulers.  This was different than my initial project.  I made sure to check each grid before students moved on to the next step.  I’m not a fan of having a simple mistake or unclear directions derail an entire project (which it did for some last year) – so I decided to check each students initial grid.

Screen Shot 2019-06-18 at 7.53.31 PM.png

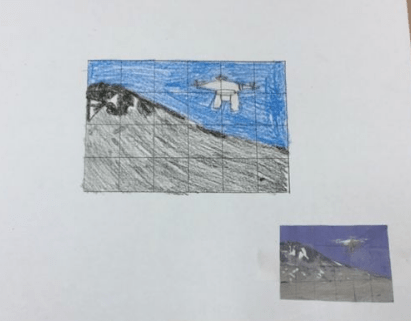
  • I also created a random piece to the amount of dilation this time around.  This picture is from last year’s post.update.pngLast year students already knew the grid to use and basically used a “paint by number” approach to fill in each square.  Although that was fun, it didn’t really hit the objectives as much as I’d like.  I had students roll a die to determine the dilation this time.  This gave four different options for students.

Screen Shot 2019-06-18 at 7.35.02 PM.png

Screen Shot 2019-06-19 at 7.45.49 AM

  • I put together a criteria for success component where students could check-off items when completed.  I set up the different dimension papers on one of the tables so students could easily grab them depending on their dilation.  I also added a short debrief piece near the end of the project where students discussed how they increased the size of the image.

These changes helped improve this particular project and I believe it created a better learning experience for the students.   There are times where I completely scrap a project and other times I make tweaks in order to make it better.  I opted for the second option this time around.

* Next year I’m planning on updating the project to include dilations that involve reducing the size of an image.

Exploring Scale Factor

Screen Shot 2018-06-02 at 10.54.08 AM.png

My fifth grade students explored scale factor and dilations this week.  This was their last week of school and it was a great topic to study as they head off to middle school next year.  Some of the geometry that they’ll see in middle school involves this specific topic. The class started early in the week with a brief Kahoot! on similar figures and enlargements as well as reductions.  This was a bit challenging as some of the shapes were rotating and students had to identify a particular side.  After discussing words like dilation, scale, and factor, I gave students a multi-day project.  This project actually stems from one of Allison’s Tweets that I read earlier in the week.

At first glance the image in her Tweet made me laugh.  My second thought was … wait… this might work in my classroom. You know how a Tweet can spark additional ideas?  Yes.  That happened here.  I asked Allison about the project and she provided additional details about the pre-image.  So I put together a direction sheet and rubric.  I decided to have students use a 5 cm x 7 cm grid.  The class then discussed how enlarging the image would change the horizontal and vertical dimensions.  I decided to not have them reduce images since the pre-image was already so small to begin with.  We did discuss how me might need a magnifying class though.

Students went through their Math Magazine.  They looked for an image inside the magazine that they found interesting.  Some students found something immediately, while others took some time.  Students then traced over the 5 cm by 7cm card, used a straightedge to create grid lines, and then finally cut out the sheet.  Students then pick their scale factor page.  Just about everyone picked the 15 cm by 21 cm grid.

Screen Shot 2018-06-02 at 10.54.02 AM.png
Note to self:  In the future I need to have students randomly  (maybe with dice) pick a different scale factor page.  

Students were then off to work in creating the image.  Some students asked questions about whether they needed to enlarge everything on the image.  Yes.  Interesting … some students thought it was just the picture that was enlarged and not the text.  Everything in the gird was increased by the same factor.  Once that was covered students made steady gains for the next 20 minutes.  They started with pencil and then shaded in the rest with color.  Students were proud of what they accomplished during the first session and many wanted to finish them up at home.

Screen Shot 2018-06-02 at 10.53.48 AM.png

Students finished up their scale factor projects on Friday.  Since it was the last day of school I sent them home.  I gave each student a survey (this might be another post) before leaving and it was interesting that many commented about how they enjoyed learning about scale factor and ending the unit with a project like this.  Maybe it’s because it was the first thing in their mind, but I thought this type of project was worth the time and will help students moving forward as they discuss similar figures next year.

I’d like to find more time over the summer to create more memorable math activities similar to this. Kids can then hold onto these experiences past the last day of school and look back on them as they make connections next school year.

%d bloggers like this: