First Name Math and Art Project

It is official. The 21-22 school year is in the books. It was a year like no other as teachers navigated remote, hybrid and in-person learning throughout the school year. One of the last projects of the year involved a first name coordinate grid task. During the last week of school my class explored coordinate grids and plotting points. Students found the midpoints of lines and solved problems involving scale models on coordinate grids. I thought this task might be a way to help reinforce coordinate points and quadrants. In addition, it was great to have students encounter math in a unique way. Kudos goes to Cathy for sharing the deck which helps guide students through a learning process of graphing points on a grid.

The instructions were key for students as they built confidence before starting the final project. Some students decided to use scratch paper and create their name there first as a draft. Other students dove right in and started the creation process. Students were given about 30 minutes to work on the project and they were asked to submit it to Canvas once finished. About half of the class finished within that time. During the next class the projects were shared and students explained how they made the different shapes and borders using tables.

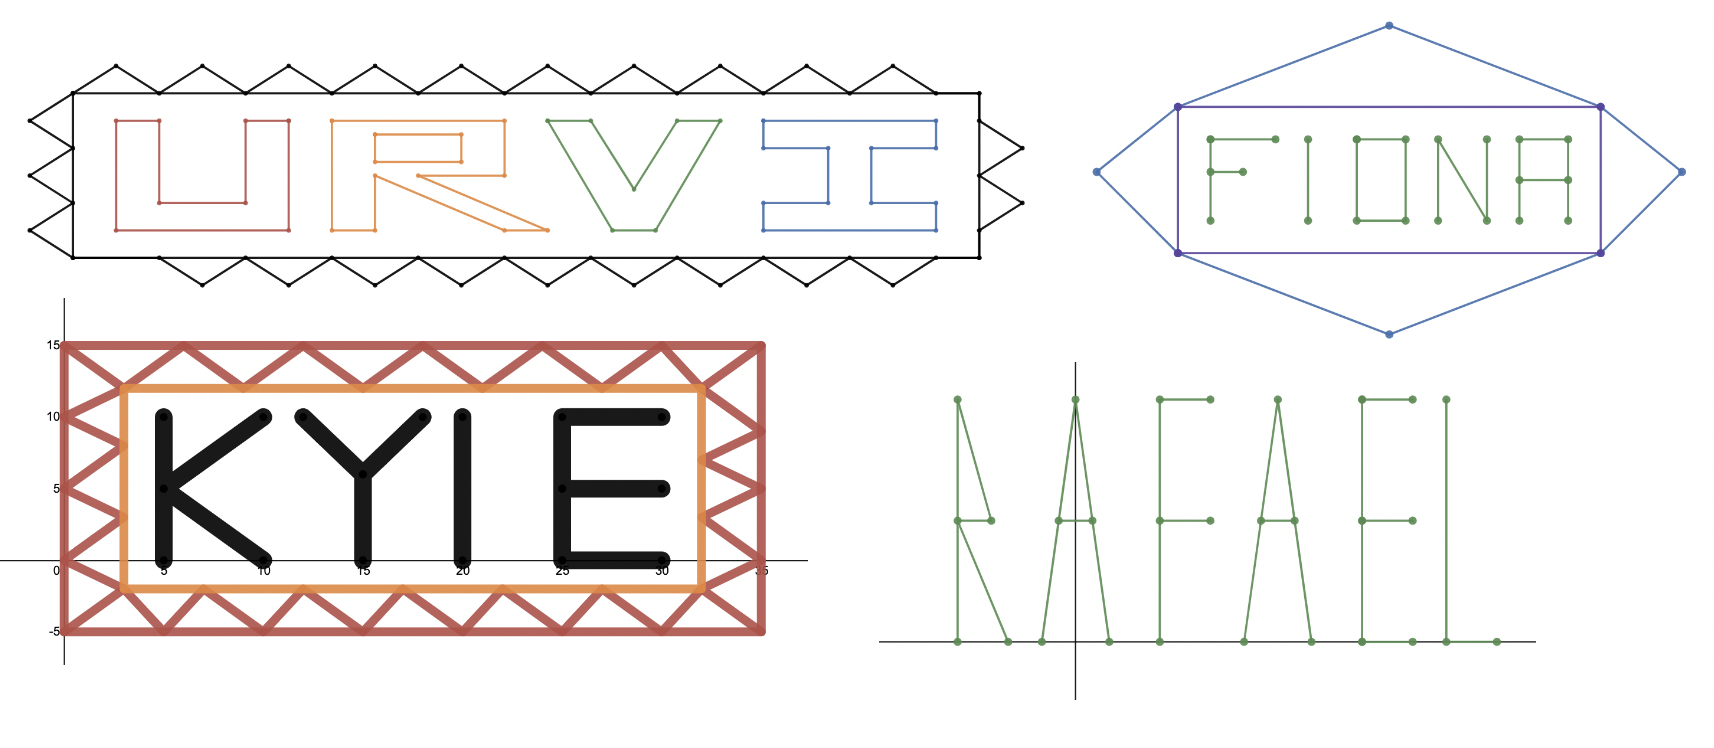
I was impressed with the time many of the students put in to make this project a reality. During the last day of school I handed each student their printed out copy of the project. I am hoping they brought it home and it is something that brings back a positive math experience memory. Looking forward, I am planning on doing this math and art combination activity next school year.

Studying Women Mathematicians and Scientists

Rosalind Franklin and the two-strand model of DNA

This year my students have been learning about mathematicians and scientists. This exploration started back during Women’s history month in March. My 3rd-5th grade classes highlighted a different woman mathematician every week. We studied Ingrid Daubechies, Florence Nightingale, Ada Lovelace and Marie Curie during the month of March. Not surprising, the study of women mathematicians was new to most students in the classroom. That dynamic changed when I asked the students to explore Mathigon’s site on the history of math.

Students were tasked to review the different mathematicians on the timeline and their contributions to society. I also asked to students to review the posters on a class bulletin board.

By the beginning of April I felt like students were feeling confident with the four women mathematicians and students started to show interest in wanting to learning more. I decided to assign a women in mathematics (could have been titled women in STEM) project at the beginning of May. Students were asked to study a female mathematician from a list

The list was mainly created from the Mathigon site and the Women in STEM site. A google form was used for students to pick their mathematician. I used a Form add-on that eliminated a choice once a person was picked to ensure different mathematicians were chosen. I also asked students to email me if they would like to study another female mathematician that was not on the list. That is how Trachette Jackson and Shakuntala Devi were added.

Students were then asked to make a copy of a Google Slide presentation template. That template was used to help students organize their thinking about what a particular slide should contain. A rubric was also created in the process.

After that the students used a Nearpod collaboration board to brainstorm what a great presentation looks like. I gave the students time to write whatever came to mind. The document was saved and then shared with the students to keep them thinking about what might help improve their presentation moving forward.

Students were then given about 2-3 weeks to periodically work on the presentation. They used time in and outside of class. They used this resource site to gather information about the mathematician. I found early on that more resources were needed and that is why I eventually turned it into a Google Sheet. Feel free to make a copy if you would like to use a similar project in your classroom

After about two weeks students were asked to share what they have put together so far. Most had 3-4 slides completed. They shared via Zoom screen share (since there are elearners and in-person students in the same class) with a partner and gave constructive feedback. Students used the opinions shares to polish up their presentations.

After finalizing their projects in Slides students screen recorded the presentation. Students used iMove to add effects and some even added a voice over element to narrate the presentation.

I am proud of what the students created given the circumstances this year and am encouraged to see students learn more about women mathematicians. I am looking forward to next week when all of the projects will be shared.

Categorizing Numbers and Number Lines

Screen Shot 2019-09-21 at 10.17.10 AM.png

This week my students explored how to categorize numbers. By then end of the week students were expected identify integers and rational numbers and apply them to real-world contexts. The class reviewed what and where to place numbers on a number line and how to classify them as whole, counting, integers, rational, and/or irrational numbers.  This was an introductory lesson and the term rational and irrational were new to them.  After a brief class conversation about the differences between rational and irrational numbers the class took a deeper dive into how to identify the characteristics of each classification.  The class looked at a few true/false statements:

  • Is 1,000,000 a counting number?
  • Is 1,000,000 an integer?
  • Is every rational number in an integer?
  • Is zero is a counting number?

The class went through these types of questions and were able to respond and justify their answers.  The questions started to get more challenging as students needed to circle  multiples answers.

  • Circle all of the numbers that belong to each set.

Integers:   4.5       2/3     102     -6       8       0


This was more challenging and took some time to categorize each number to see if it fit accordingly.  Students were then asked to place numbers on vertical and horizontal number lines.  I was glad to see how well the students responded to the vertical number line as I don’t believe they get enough practice with those.

Students had about 20 minutes left and one project to complete.  I introduced students to a number line project.  I ended up going with Google Draw for this project because I don’t have enough access to iPads at the time and I was able to checkout a Chromebook cart for this particular lesson.  Students were given a prompt to use dice to create numbers and fractions to place on a number line.  They rolled and found their numbers.  Students used their Chrombooks to access bit.ly/mrcoaty.

Screen Shot 2019-09-21 at 10.06.25 AM.png

Students make a copy of the Google Drawing and added their numbers to the number line.  It took some work to manage the tools involved in this platform.

Screen Shot 2019-09-21 at 10.08.16 AM.png

I explained what each icon meant and how they could use it to make the number line their own.  It wasn’t as smooth of a transition as I thought it’d be, but students persisted and were eventually able to place the numbers they created on the number line and dragged the label to each number.  Students were then expected to take their drawing, save it as an image and place it in their individual SeeSaw account.

Screen Shot 2019-09-21 at 10.10.12 AM.png

Not all students finished this in class and I sent it home as optional homework for students to complete.  The above example is from one student that took it home and completed it before putting it into their SeeSaw account.

Screen Shot 2019-09-21 at 10.13.23 AM.pngNext week the class will be investigating the number line in more detail and continue to categorize numbers.

Measurement and Reasonable Solutions

Screen Shot 2019-05-15 at 8.38.35 PM

My fourth grade students finished up a project involving area last week.  Students were asked to find the area of different playing areas for certain sports.  They first calculated the areas of the playing field by multiplying fractions and then found the product.

The next step involved creating a visual model on anchor chart paper.  Students worked in groups to put together their athletic park involving the field areas.  They were given the area of the park and then had to place the fields where they wanted according to the team’s decision.  Students also added additional facilities for their athletic field and then presented their projects to the class.

While presenting, students in the audience were required to either 1) ask a question or 2) provide a constructive comment.  Most of the questions that were asked related to why certain fields were placed in specific areas on the field.  One question stood out more than the others … does the distance make sense?

image2.jpg
The locker rooms had to be adjusted (see whiteout) as one student said, “It doesn’t make sense so I changed it to match the 120 yd.”


image1.jpg

Students were looking at the length of the fields and observing whether it was reasonable or not compared to the total length.  The class then had a conversation about the terms reasonableness and proportions.  The discussion involved how a double-number line and a grid could’ve helped visualize how the distances match.

image3.jpg

I’m hoping to revisit this idea during the next few weeks as the school year finishes up.


Making Math Projects Worth the Time

Screen Shot 2019-03-24 at 10.41.19 AM


My fourth graders are in the midst of math project. They’ve been studying measurement and are completing a project involving creating nets, assembling them and finding the volume.

Screen Shot 2019-03-24 at 10.42.41 AM.png

I’ve used this task in years past and students spend a decent amount of time planning and putting together their rectangular prism cities.  It’s generally one of the “favorite” activities of the year as indicated by student surveys that I give in June.  The engagement is great and students are proud of what they create at the end.  Now to the challenging –  It takes an LARGE amount of time to complete these types of projects.  Students have the potential to lose focus and stray from the concept/objective.  I’m certainly not a pro with math projects, but I’ve found certain things work, while others don’t.  The bullet list below could apply to other long-term (>3 class sessions) projects beyond math. I’m tackling the points below before I plan out a fifth grade project that’s scheduled to take place in April.

  • Clearly define directions, expectations and criteria
    • I spend a good 15-20 minutes explaining the project and directions with the students.  During this time I’ll answer students’ questions and elaborate on the criteria for success.  I tend to also reinforce the expectations of how teams should work together (because all teams works great, right??) and what goals they’ll accomplish by the end of the project
  • Objectives … Objectives … Objectives
    • I remind the students of the objectives and skills that the project will be addressing.  The projects are fun and engaging for the students, but I want to ensure that they understand the reasoning behind the project.  Teachers understand why the project is happening, but it’s also good to have a list available when an admin stops by your room and students look like they’re creating something massive with paper, iPads, scissors, glue and other materials.  Also, the SMP‘s can play a huge role here.  I personally find it challenging to pinpoint exactly where the SMP’s become directly evident in lessons (it’s usually a vague “hey look we’re using attend to precision here” type of statements.  Math projects are full of the SMP’s and this aspect can be part of the objectives and emphasized in a self-reflection activity – see last bullet point.
  • Eliminate specific models/examples
    • This might irk some people, but I’m not a fan of showing examples of what their project should look like.  Providing really vague or general examples are okay in my book.  I tend to get questions asking if a certain aspect of the project could look like _____.  I tell students that if it follows the criteria it’s good to go. Ideally, I’d like students to work together and create something original, not copy what I show as the example.  This allows students an opportunity to focus on the criteria and not “what the teacher wants” type of mentality.
  • Create a timeline 
    • I find creating a timeline is one of most important pieces when introducing the project.  Adding in checkpoints along the way where teachers “check-in” on what’s happening gives students (and me) an added accountability piece to make sure we’re sticking to what’s expected.
  • Be flexible
    • Sometimes timelines need to be changed.  Assemblies, snow days, fire drills, (insert an event that impacts your instruction) happen.  Be upfront with the students that the time will need to be extended.  Most of my students give a sigh of relief when I tell them that they’ll have an extra period to work on the project – so do I as I want to make sure that they make a quality product.
  • Include self-reflection
    • Students need time to process the math that they’re using while completing a project.  I like to give students time to write down how they’re using the time that they’re given and what was accomplished during that session.  I find providing this time gives me an insight to how each group is progressing and also adds an emphasis on what skills are being addressed.  For math projects, I find that adding a reference to the SMPs can be an added bonus as most of them become apparent as students create their projects.
  • Sharing is caring
    • After everyone has finished I like to share the projects to people outside of our classroom community.  I might share a link out on Twitter and have the students submit their projects to SeeSaw.  Sharing with other classrooms in the district has an added bonus.  Plus, students are creating their projects for an authentic audience and they have the potential to receive feedback.  That adds another quality component in my mind.

I find that having these components in place before assigning a long-term project to be helpful.  It makes the project worth the time as students are more efficient during that time and the quality of what’s created tends to be better.

Volume and Group Tasks

2examples-01.png

My fourth grade students have been exploring measurement and geometry during the past week.  They started out by learning about perimeter, area, and are now in the midst of discussing volume.  Students are working on a project where they’re building rectangular prism models and constructing cities.  They document the dimensions, cut out the rectangular prism that matches the measurements and places it on a map.

The groups have been working diligently over the past days.  What I found interesting on Friday were the student conversations.  As I peered over each group I eavesdropped on what was being said.  Students are in groups of 2-3 and there’s plenty of conversation happening.  Students are recognizing that the length, width and height all impact the volume of a rectangular prism.  Mistakes are also happening.  That’s a good thing.  Students have had to use multiple grid sheets because they either cut out the faces too large or too small.  They just grab another grid sheet and start over again.  Their perseverance and being able to “lean into the struggle” is evident and I made sure to remind them of that.  Students were even getting creative in adding sunroofs and open decks with their prisms.

Projects like this take time, but they’re often worthwhile in helping students build conceptual understanding.  I’m looking forward to adding a question component for the groups on Monday.  The questions will relate to cubic units and how the volume is found when combining multiple rectangular prisms.

I believe that this activity helps students apply volume formulas.  I want students to come away with a better understanding of why the formula V = b*h is used and have them feel more confident in being able to see geometry/measurement relationships.

After this activity students will take a brief formative checkpoint where they’ll be answering questions similar to the below image.  This is also how students will be assessed in a couple weeks.

3dcomboshape

The projects should be finished by the end of the next week.  I’m looking forward to seeing how the cities finish up and the student reflections that follow.

Castle Area Project

Photo Jun 01, 2 39 02 PM.jpg

My fifth grade students just finished up a unit on geometry relationships.  They took the unit assessment with mixed results. I noticed that some students struggled a bit to complete problems involving geometry and formulas.  Specifically, students inconsistently used formulas correctly to find volume, area and surface area. Keeping in mind that there’s only three days left of school, I balanced the idea of having students complete a brief geometry project or dive right into a review packet.  I decided on the project.  The project is similar to another one, but has a Hogwarts type of feel and the focus is more on surface area.  I paired up students and told them that they have literally three days to complete this project as that’s how many days of school we have left.  Students were given an introduction letter that basically explains that their team’s job is to create a model of a new museum.  The museum must take the shape of a castle.

Screen Shot 2017-06-03 at 7.03.08 AM

After briefly explaining the difference between surface area and area the class was off to creating their kingdoms.  Students used nets and a map sheet to create a base for the castle.

Screen Shot 2017-06-03 at 7.21.20 AM

Students were required to subtract the circle of one of the towers from the square base.  That was interesting, as some students decided to count the squares, while others jumped right in and used a formula.  I gave students a formula reference sheet but also had them access the OpenMathRef page.  That was a fantastic resource as kids could manipulative the object to see how the surface area changes.  Students also noticed that they needed to measure the slant height of the pyramids and cones.  This was a new experience for them.

Screen Shot 2017-06-03 at 7.31.03 AM
http://www.mathopenref.com/conearea.html

Students cut out the nets and glued/taped them to the map.

Screen Shot 2017-06-03 at 7.17.42 AM.png

They had to make sure to cut out the nets correctly or they wouldn’t “close” and finish the shape.  Students filled out their formula sheets after or during the construction process.  One sheet was designated for the surface area and the other for floor area.

Screen Shot 2017-06-03 at 7.16.53 AM.png

Students have made progress during the last two days.

Photo Jun 01, 2 17 15 PM.jpg

Next week they have one day to finish.  I’m planning on having those that finish complete  a stop-motion video of their city with action figures.  I’m looking forward to seeing the student creations.


Side note:  On Friday students were given were given the opportunity to use the Crafty Cut app.  Kudus to Trever for finding this gem.  Basically, students are given a shape and they have to make one or two cuts to create an additional shape.  We only used the free version and it worked just fine for my fifth grade class.  I thought it helped kids see geometric shapes in a different light.

Camping and Rates Project

Screen Shot 2017-05-13 at 8.36.30 AM.png

My third grade class is nearing the end of a unit on rates. We’ve been discussing tables and how to use them to record rate information. The students have been given a number of opportunities to fill in missing sections of tables when not all the information is present. They’ve been required to find unit prices of items to comparison shop.  We spent a couple days just on that topic. Whenever money is involved I think the kids are just a tad more interested in the problem. For the most part, students were able to find the unit price of items. It was a bit of a challenge to round items to the nearest cent. I used Fawn’s activity to help student explore this concept.  For example, 32.4 cents per ounce is different than 32 cents per ounce. When to round was also an issue, but I believe some review helped ease this concern. Near mid-week, students were picking up steam in having a better understanding of rates and how to find unit prices to shop for a “better buy” when given two options.

I introduced a camping rates activity on Wednesday. This was the first time that I’ve tried this activity as I have time to use it before the end of the year approaches. Here’s a brief overview: Students are going to be going on a camping trip. The student is responsible for shopping for the food (adding the unit prices), sleeping bags (for the entire family) and tent. They can spend up to $50 for the food and their complete total has to be less than $500.

Screen Shot 2017-05-13 at 8.32.48 AM.png
Camping file

Students used Amazon to find the items. The most challenging part in this assignment was finding tents and sleeping bags that were the appropriate sizes. The tent had to be at least 100 square feet and each sleeping bag at least 15 square feet. That’s where some problems starting to bloom. Converting the measurements for the tents and sleeping bag took some time. Most sleeping bags were small enough that their measurements were in inches and students needed to record their answers in feet.

Screen Shot 2017-05-13 at 8.46.28 AM

The tent dimensions were in feet so that didn’t cause much of an issue. Students had to figure out which dimension indicated the height and not include that in the square feet. Although, some students thought that was an important piece. Maybe I’ll change this assignment up next year to add a height component. So this took a bit of explaining and guidance, but we worked out the kinks. Students used tables to convert square inches to square feet.

Next week, students will be creating a video of their camping activity. They’ll be taking some screen shots, explaining why they picked each item, (I chose food/this particular tent/sleeping bag because …) explain the unit prices of the food items, describe the process used to find the square feet of the sleeping bag and tent, and how they were able to keep the total cost below $500. I believe they’ll be using Adobe Spark to create this presentation. I need to remember to cap the videos at around three minutes, as some go a bit too long as they might talk more than they needed. I’m looking forward to seeing how this turns out next week.

%d bloggers like this: